
You want to learn the correct method for crimping coaxial cables. We will show you the essential steps for a secure connection. Discover how to achieve reliable coaxial cable installations. With MARSHINE Crimping Tools, you can confidently create high-quality, durable connections every time.

Before you start crimping, gather the right tools. Having the correct equipment makes your job easier and ensures a strong, reliable connection.
You need a stripper made specifically for coaxial cables. A good stripper handles various cable diameters. Look for advanced strippers with multiple blades. These tools precisely expose the dielectric insulation, shielding, and conductor to the correct lengths. They often perform a three-step stripping process. You want one that can do 2-level and 3-level stripping on common types like RG58/RG59. Adjustable blades are also important. They help prevent cable damage. Some versatile strippers even cut and ring other cable types like Teflon or fiber.
Selecting the right crimping tool is crucial for a secure connection. Different jobs require different tools. For example, MARSHINE Crimping Tools offer a range of options.
You need a tool that matches your connector and cable type.
You must match your coaxial connectors to your cable type. Coaxial cables come in different impedances. For example, 50 Ohm cables are great for commercial uses like radio systems and antennas. They handle high power. On the other hand, 75 Ohm cables are mostly for residential applications. Think TVs, internet, and home cell signal boosters. These offer more flexibility. Your connector must have the same impedance as your cable for the best performance.
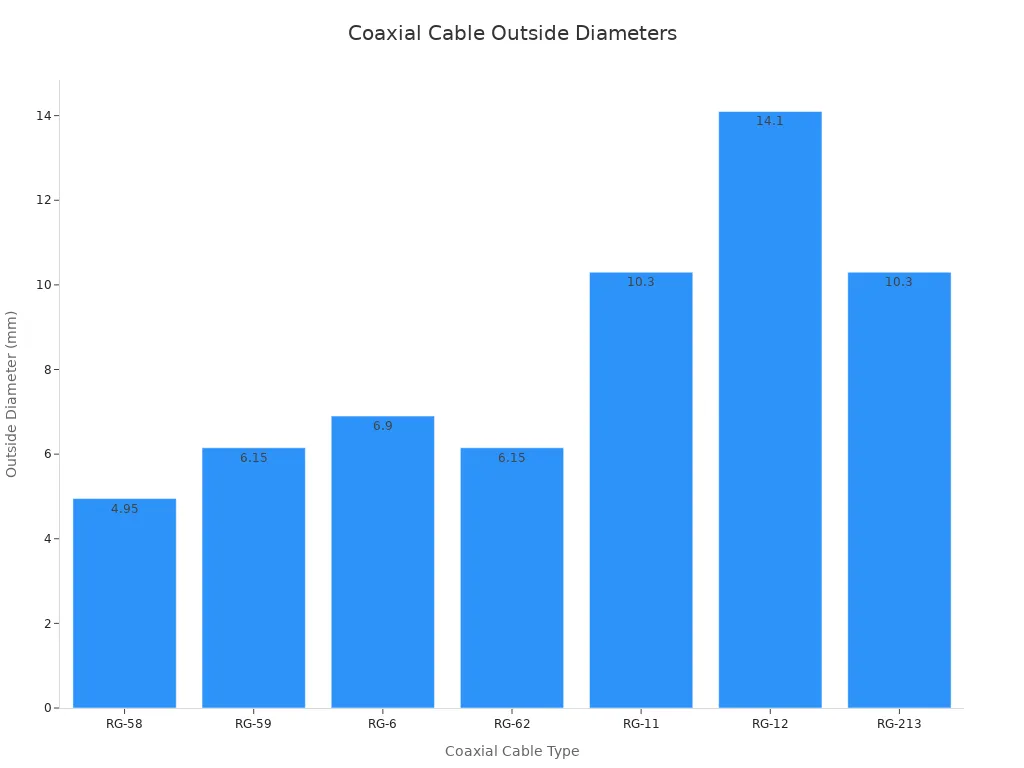
Knowing your coaxial cable type is very important. You can identify cables by their physical diameter and other markings. For instance, RG-6 is a common type for cable television signals. It has a 6.9mm outer diameter. RG-59 is thinner, with a 6.15mm outer diameter.
You can also look for shielding types. Some cables have single shielding, others have dual or quad shielding. Material markings like "PE" for Solid Polyethylene or "FE" for Foam Polyethylene also tell you about the cable's construction. The Radio Guide (RG) number also helps. A higher RG number means a thinner central conductor core.

Now that you have your tools ready, it's time to prepare your coaxial cable and attach the connector. This process needs precision for a strong, clear signal.
First, you need to decide how long your cable should be. Measure the distance you need to cover. Then, cut the coaxial cable to that exact length. Use a sharp cable cutter to get a clean, straight cut. A clean cut prevents damage to the internal wires. This step is simple but important for a good start.
Stripping the cable is where precision really matters. You need to remove specific layers without damaging the delicate inner parts. Here's how you do it:
Different connectors need slightly different stripping lengths. Here’s a general guide for common connector types:
| Stripping Lengths | F-Type Connectors | RCA Connectors | BNC Connectors |
|---|---|---|---|
| X | 0.25" ~ 0.30" | 0.17" ~ 0.18" | 0.17" ~ 0.18" |
| Y | 0.25" ~ 0.30" | 0.25" ~ 0.30" | 0.25" ~ 0.30" |
| Z | 0.50" ~ 0.55" | 0.50" ~ 0.55" | 0.50" ~ 0.55" |
Remember, these are general guidelines. Always check your specific connector's instructions for the most accurate stripping dimensions.
After stripping, you must inspect your cable carefully. This step helps you catch any issues before you crimp. Look for these signs:
Damaged cables or poorly stripped ends can lead to signal loss or interference. You want a perfect strip for a perfect connection.
Now, you are ready to attach the connector. This is where your MARSHINE Crimping Tools come into play.
Using MARSHINE Crimping Tools helps you achieve a professional and reliable connection every time.
You have prepared your cable and attached the connector. Now, you need to execute the crimp. This final step secures your connection. It ensures signal quality and durability.
Choosing the right crimping die is very important. It directly impacts your connection's quality. You need to identify the specific connector type you are using. Different connectors, like coaxial or insulated terminals, require unique dies. For coaxial connectors, you will use a coax-specific hex die. This die must match your cable type.
Always consult the manufacturer's datasheets. These sheets give you crucial information. They tell you about suitable dies, approved wire ranges, and compatible crimp tools. You must match the die to the wire size perfectly. Dies are marked with gauge ranges. This ensures compatibility. An incorrect size can lead to a loose or overly tight crimp. Also, check your crimp tool's compatibility. Not all dies fit every tool. Look at die dimensions, mounting style, and pressure rating.
Remember, even if connectors from different manufacturers look similar, they might need different crimp dies. Small detail variations can make a big difference. Always verify you use the correct crimp die for each cable and connector combination. This precise matching guarantees a secure and reliable crimp. It prevents issues like loose connections or wire damage.
Once you have the correct die, position your connector carefully. Open the jaws of your crimping tool. Place the connector, with the cable already inserted, into the appropriate slot on the die. The connector's ferrule should sit snugly in the die's cavity. Make sure the cable's center conductor aligns correctly. It should not be bent or off-center. Proper positioning prevents damage to the connector and ensures an even crimp.
Now, you apply pressure to crimp the connector. This is a critical step for a secure connection. Applying the correct amount of pressure is crucial. Too little pressure results in a loose connection. Too much pressure can damage the wire or terminal. Many crimping tools, including MARSHINE Crimping Tools, are calibrated to ensure consistent pressure.
The ideal crimping pressure, also known as crimp force, tightly compacts the wire strands within the terminal. This eliminates air gaps. It creates a large contact surface area. This leads to optimal electrical conductivity and minimal resistance. You must ensure the wire is tight within the terminal. This creates secure crimp terminations. The crimp tab must form a strong mechanical bond with the wire. This prevents any looseness. It is a delicate balance. You want to achieve compaction without over-compressing. Over-compressing could damage the wire strands or the terminal.
After crimping, you need to test your connection. First, perform a visual inspection. Look for any signs of damage or an uneven crimp. The connector should look uniform and securely attached. Next, give the cable a gentle tug. The connector should not pull off or feel loose. This "pull test" confirms the mechanical strength of your crimp.
For a more thorough check, especially for critical applications, use a continuity tester or a cable certifier. These tools verify the electrical integrity of your connection. They ensure there are no shorts or open circuits. They also check for proper signal transmission.
Many coaxial cable performance issues come from errors during initial installation. Approximately 40% of all coaxial cable performance issues stem from these mistakes. These flaws compromise system integrity, longevity, and signal quality. They lead to rapid degradation within 12-18 months. You might experience intermittent dropouts, slow internet speeds, or pixelated video. The financial impact is significant. A technician dispatch can cost $90-$125.
Here are some common mistakes you should avoid:
By avoiding these common errors, you ensure a high-quality, durable, and reliable coaxial cable installation.
You now master coaxial cable crimping. This lets you create reliable connections. Apply these proper techniques for durable and effective cable assemblies. You can confidently build high-quality coaxial installations. You will achieve excellent signal quality and lasting performance every time. Go ahead and connect with confidence!
You must match the die to your connector and cable size. This ensures a secure, reliable connection. An incorrect die causes loose or damaged crimps, leading to signal loss.
You risk poor signal quality or connection failure. Testing confirms your crimp is strong and electrically sound. It prevents future headaches and costly repairs.
No, you cannot. You need a tool and die that match your specific connector and cable type. Using the wrong tool creates weak, unreliable connections.


