

You want to bury cables effectively. This guide helps you master the safe operation of your MARSHINE Diesel Powered Cable Trench Machine Cable Installer Hand Held Cable Burying Tool. You will learn essential steps for various cables, like Copper Tracer Wire or Aluminum URD, and understand depths for items such as GFCI-protected Type UF cable or PVC conduit.
Before you start burying any cables, good preparation makes all the difference. You want to ensure safety, efficiency, and a successful outcome for your project. This involves understanding your work area, gathering the right supplies, and checking your equipment.
Your first step is always to know what lies beneath the surface. You must identify any existing underground utilities before you dig. This is not just a good idea; it is a safety requirement. OSHA standard 1926.651(b)(1) tells you to determine the estimated location of utility installations like sewer, telephone, fuel, electric, and water lines before you start any excavation.
You should contact utility companies or owners within your local response times. They will help you mark the locations of their lines. If they cannot respond within 24 hours (or a longer period if your state or local law allows), you can proceed cautiously. You use detection equipment or other acceptable methods to find these lines. When your excavation gets close to the estimated location, you must determine the exact spot using safe and acceptable means. For example, hydro-vacuum excavation can be a good method if you adjust it to avoid damaging utilities.
Look for the standardized color-coding system from the American Public Works Association (APWA). These colors tell you what kind of utility is present:
You also need to consider the soil conditions. The environment's volatility, including soil types and load, plays a big role. Factors like frost and settlement can affect the stability of direct burial conduit. Soil can also cause corrosion. Certain soils have corrosive properties that can degrade cable materials over time. You must choose cables with appropriate protective coatings to ensure they last a long time. For deep trenches or specific soil conditions, you might need a heavier wall conduit.
Once you understand your site, you gather everything you need. Safety always comes first. You should have:
Before you even think about starting the engine, you must perform a thorough pre-operational inspection of your MARSHINE Diesel Powered Cable Trench Machine Cable Installer Hand Held Cable Burying Tool. This crucial step helps prevent equipment failure and lets you fix small issues before they become big problems.
You should check several key items:
Taking these few minutes to inspect your equipment ensures it operates safely and efficiently throughout your cable burial project.
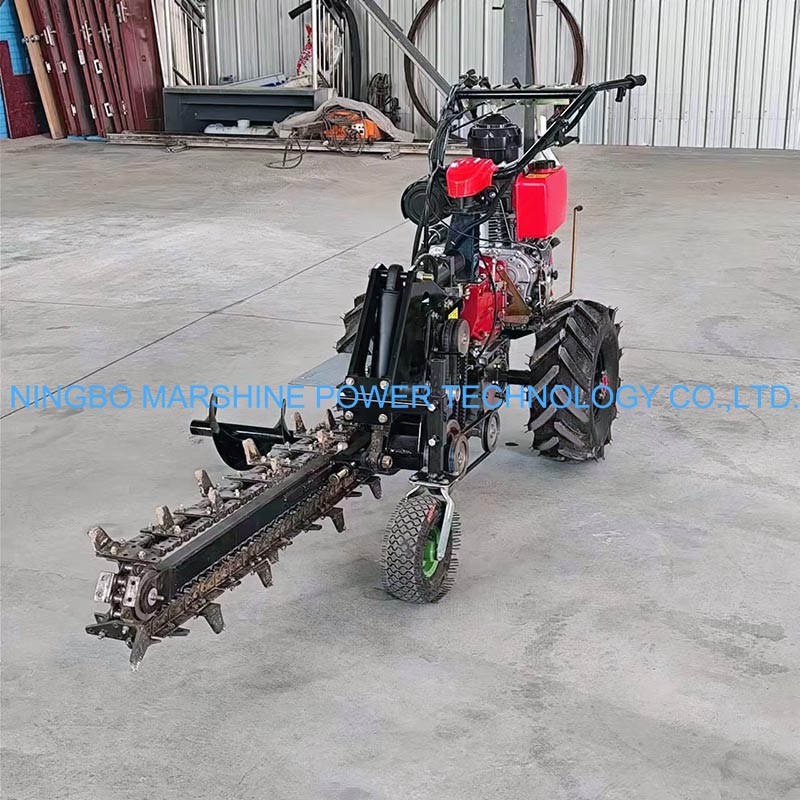
Now that you have prepared your site and inspected your equipment, you are ready to put your MARSHINE Diesel Powered Cable Trench Machine Cable Installer Hand Held Cable Burying Tool to work. This section guides you through the actual process of burying cables, from starting the trench to ensuring proper depth and coverage.
You begin by carefully positioning your MARSHINE tool. First, you need a clear path. You should mark the cable path using spray paint or a string line. This helps you keep your trench straight and accurate. Once your path is marked, align the burying blade of your tool with the starting point of your planned trench.
Make sure the tool is stable and on level ground if possible. You want to avoid starting on a steep incline or decline. Lower the burying blade slowly until it just touches the ground. Then, engage the power and begin to move forward at a slow, steady pace. This initial pass creates a shallow cut, guiding you for the rest of the trench. You are essentially drawing your first line in the dirt.
As your MARSHINE tool moves forward, it creates the trench. You need to guide the cable into this newly formed trench. Many MARSHINE tools have a cable guide or chute that feeds the cable directly behind the burying blade. You simply feed your cable into this guide. Make sure the cable unspools smoothly from its reel. You do not want any kinks or snags.
After the cable is in the trench, you need to secure it. This involves careful backfilling. You fill the trench with soil carefully to prevent damage to your wires or conduit. For added protection and future identification, you can use warning mesh and utility warning tape. These mark the cable locations and help ensure they remain in place.
You should fill the trench in layers. Compact the soil by hand directly above the cables. This helps to settle the soil around the cable. For the top layer and surrounding soil, you can use a compactor machine. This ensures the ground is firm and stable. Finally, you restore the ground. You replace any removed pavement or landscaping to make the area safe and neat.
Different cable types need different protection methods:
| Cable Type | Protection Methods |
|---|---|
| Direct Burial Cable (UF-B) |
- Depth: 24 inches (without conduit or GFCI) or 12 inches (with GFCI protection). - Protection: Suitable for direct burial, but additional protection like sand bedding or warning tape is recommended in rocky areas. |
| Conduit (PVC or Metal) |
- Depth: 18 inches (PVC) or 6 inches (metal). - Protection: Provides excellent physical protection against damage from digging, rocks, and roots. Wires are pulled through after installation. |
| Armored Cable (MC Cable) |
- Depth: Varies based on local codes, often similar to direct burial. - Protection: Features a metallic armor for enhanced physical protection, making it suitable for areas where mechanical damage is a concern. |
| Tray Cable (TC Cable) |
- Depth: Typically installed in cable trays, but can be buried if rated for direct burial. - Protection: Often used in industrial applications, offering good protection when installed in conduit or trays. |
| Low-Voltage Cable |
- Depth: Varies, often shallower (e.g., 6-12 inches) for landscape lighting or irrigation. - Protection: May require conduit or protective sleeving depending on voltage and local regulations. |
| Fiber Optic Cable |
- Depth: Varies, often similar to electrical cables. - Protection: Can be direct-buried or installed in conduit. Special considerations for bending radius and rodent protection are important. |
For rocky, heavy clay soil, or areas with tree roots, installing galvanized metal rigid electrical conduit with individual insulated wires pulled inside provides superior protection for buried wiring. This minimizes the need for extensive digging.
Maintaining a consistent burial depth is crucial for cable protection and compliance with regulations. You can achieve this with a few operating techniques. First, you need proper installer training. This emphasizes regular depth verification during cable placement. You should not just guess; you need to check.
Plow and trenching equipment operators also require immediate feedback on depth to maintain consistency. You can use simple techniques like marked plow blades. You also make periodic measurement stops. This helps ensure you meet specifications throughout the installation, not just at inspection points. You want to avoid a roller coaster effect with your cable depth.
You will likely encounter obstacles or need to make turns during your cable burial project. Navigating these situations safely and effectively is key.
Tip: Always be aware of what might be underground. Utility markings can be inaccurate or incomplete. Look for visual cues like gas meters or electrical boxes.
Here are some steps you should follow:
When you approach an obstacle, you should slow down. If it is a small, immovable object like a large rock, you might need to carefully maneuver around it. For larger obstacles or existing utilities, you must stop. You then physically dig small holes, a process called potholing, to visually confirm the exact location of pipes or cables. This is especially important when utilities run parallel or cross new installations. Vacuum excavators are recommended for this to avoid damage.
You can also use locating equipment. Tools like electromagnetic locators detect magnetic fields from electrical currents. Ground Penetrating Radar (GPR) locators use electromagnetic impulses to map underground objects. You should confirm locations with your own personnel and equipment, especially on private property where One-Call services may not apply.
For corners, you cannot make sharp, abrupt turns with your MARSHINE Diesel Powered Cable Trench Machine Cable Installer Hand Held Cable Burying Tool. You need to create a gentle curve. You might need to lift the blade slightly, reposition the tool, and then re-engage to create a smooth turn. This prevents damage to the cable and ensures a continuous trench.
The final step in operation is ensuring you have achieved the proper cable depth and coverage. This is critical for safety and the longevity of your installation. Different areas and cable types have specific minimum depth requirements.
For example, here are some common minimum depths:
You also need to consider the area classification of the ground.
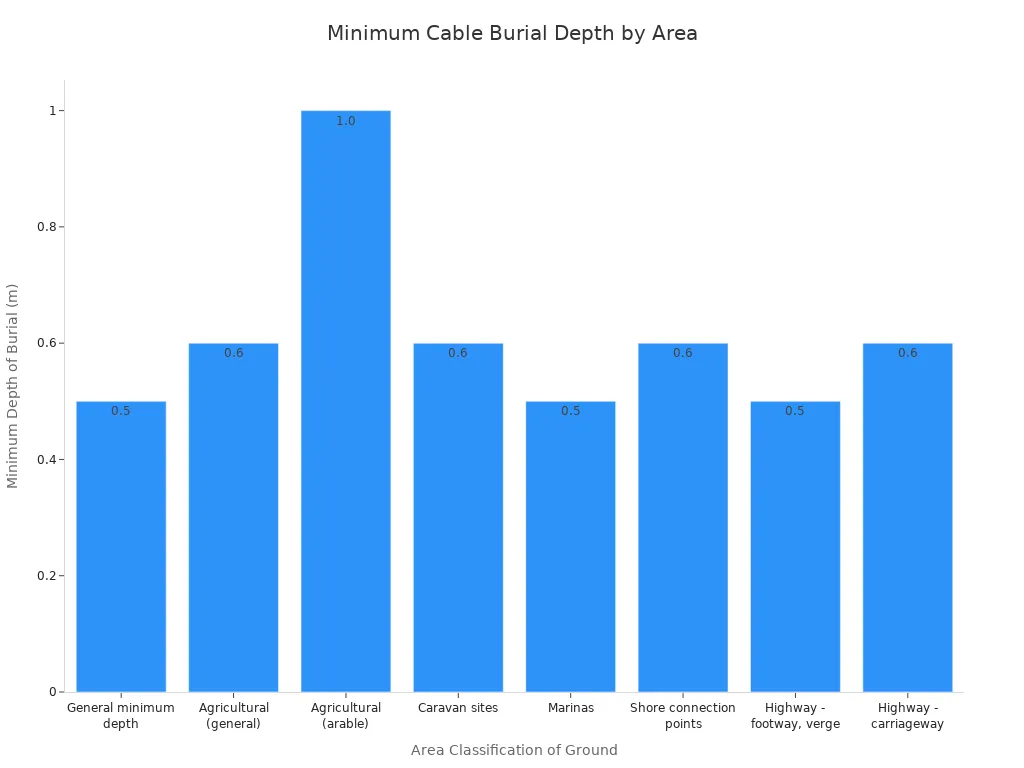
For low-voltage cables in a 2m sidewalk, Streetworks UK recommends a minimum depth of 450 mm. IET Guidance Note 1: Selection & Erection suggests a minimum depth of 500 mm for installations where ground preparation does not meet highway constructional standards. This protects against ground movement and frost heave. In special installations or locations, such as those detailed in Part 7 of BS 7671:2018+A2:2022, specific minimum depths are mandated. For instance, in agricultural and horticultural premises, Regulation 705.522 specifies a minimum depth of 0.6 m, increasing to 1.0 m for arable or cultivated ground. For caravan/camping parks and similar locations, and onshore units of electrical shore connections for inland navigation vessels, a minimum depth of 0.6 m is required (Regulations 708.521.7.2 and 730.521.101.3.2). In marinas and similar locations, Regulation 709.521.1.7 requires a minimum depth of 0.5 m. Remember, these are minimum depths. Deeper burial may be necessary to prevent damage from foreseeable ground disturbance.
Always double-check your local codes and regulations. You want to ensure your installation meets all requirements. After you have laid the cable and backfilled the trench, you should visually inspect the entire run. Look for any areas where the cable might be too shallow or exposed. You want a smooth, consistent finish.
You have successfully buried your cables. Now, you need to finish the job right and take care of your equipment. Proper post-burying steps and regular maintenance ensure your project lasts and your tool stays ready for the next task.
Backfilling is more than just throwing dirt back into the trench. You want to protect your newly laid cables and restore the area. First, you excavate the trench to the proper depth, making sure you remove any sharp rocks or debris. Next, you add a layer of sand or screened soil to cushion the cable. This protects it from future damage. Then, you place warning tape approximately 12 inches above the cable. This alerts future excavators to the buried lines. You carefully backfill the trench in layers and compact the soil. This prevents future ground subsidence. Finally, you restore the surface to its original condition or better. You also label the circuit at the panel and maintain records of the trench path for future reference.
After a long day of work, you must clean your MARSHINE Diesel Powered Cable Trench Machine Cable Installer Hand Held Cable Burying Tool. You should remove all dirt, mud, and debris from the blade, engine area, and wheels. This prevents rust and keeps parts moving freely. Use a stiff brush or a pressure washer for stubborn grime. Check for any loose bolts or damaged parts. Once clean and dry, store your tool in a dry, secure place, away from harsh weather. This protects your investment and extends its lifespan.
Even with good maintenance, you might encounter issues. If your tool does not start, check the fuel level and spark plug. If the blade is not cutting effectively, inspect it for damage or dullness. You might need to sharpen or replace it. If you notice inconsistent depth, check the blade's adjustment and ensure the ground is not too hard or rocky. Always refer to your tool's manual for specific troubleshooting steps.
You now have the knowledge to bury cables with confidence. You can achieve professional results on every project. Your MARSHINE Diesel Powered Cable Trench Machine Cable Installer Hand Held Cable Burying Tool helps you do this. Follow these steps for safe and effective cable installation. You will complete your tasks efficiently.
You must follow local codes. Depths vary. For example, GFCI-protected UF cable needs 12 inches. Non-GFCI UF cable needs 24 inches. Always check your specific project requirements.
You should stop immediately. Use potholing or vacuum excavation to find the obstacle. You can then carefully work around it. Never force your tool through unknown obstructions.
You should clean your tool after every use. This removes dirt and debris. Regular cleaning prevents rust and keeps parts moving smoothly. It extends your tool's life.


