

Precise tightening is crucial for safety and longevity in many tasks. A torque wrench ensures fasteners are neither too loose nor too tight. Modern tools, like a digital torque wrench, offer incredible accuracy. For delicate jobs, an inch pound torque wrench provides specific control. MARSHINE provides reliable tools for all your tightening needs.
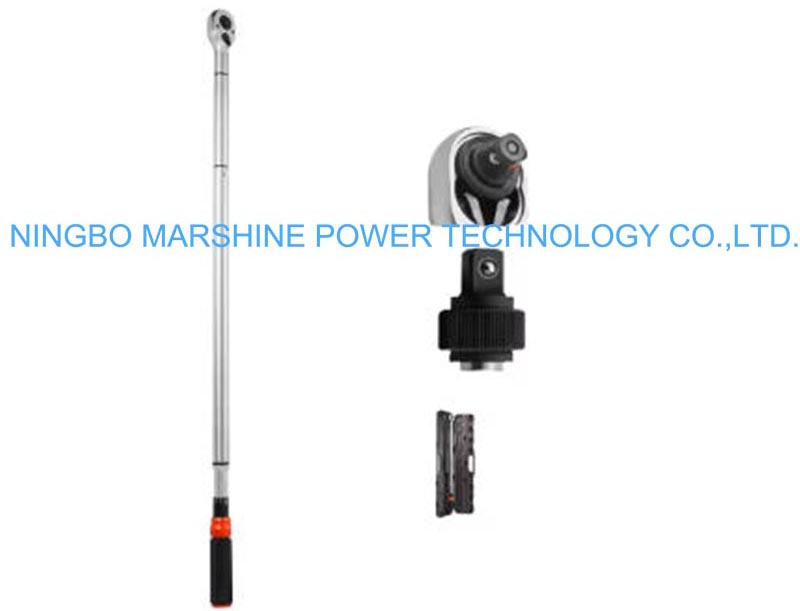
Many different types of torque wrenches exist, each designed for specific tasks. You will find manual (click-type) torque wrenches are common. They click when they reach a preset torque. This makes them great for tight spots or when you cannot see well. For very high-torque bolts, people use torque multipliers. These tools increase torque without needing more force from the user. This improves both safety and precision. Electric torque wrenches, either corded or battery-powered, offer precise accuracy, usually within ±3% to ±5%. You can preset them to a desired torque. Hydraulic torque wrenches handle even larger jobs, delivering over 25,000 ft.-lbs. of torque. They come in square-drive or low-profile designs. Finally, pneumatic torque wrenches provide higher torque than manual or electric ones. However, they need extra equipment like an air hose and compressor. MARSHINE offers a wide range of these specialized tools, ensuring you have the right equipment for any job.
A torque wrench has several key parts that make it work. For a click-type model, an internal spring mechanism is central to its operation. You adjust its tension for the desired torque setting. A ball detent and spring mechanism is preloaded by an adjustable screw thread, calibrated in torque units. This ball detent transmits force until it reaches the preset torque. A clutch mechanism also helps in presetting torque, offering greater precision. As you apply force to the wrench, it twists. The increasing force eventually overcomes the spring's resistance. When the preset torque is reached, the spring's force is overcome. This causes the ball to 'click' out of its socket. This provides both an audible click and a tactile feel. This signal tells you to stop applying force.
Understanding torque units is essential for accurate tightening. Different systems use various units. American units include ozf.in (ounce force inch), lbf.in (pound force inch), and lbf.ft (pound force foot). The International Standard (S.I.) uses mN.m (milli Newton meter), cN.m (centi- Newton meter), and N.m (Newton meter). Metric units include gf.cm (gram force centimeter), kgf.cm (kilogram force centimeter), and kgf.m (kilogram force meter). You often need to convert between these units. Here is a table showing common conversion factors:
| Unit | in•lbf | ft•lbf | N•m | kgf•m | dyne•cm |
|---|---|---|---|---|---|
| 1 in•lbf | 1 | 0.08333333 | 0.1129848 | 0.01152125 | 1.129848 E6 |
| 1 ft•lbf | 12 | 1 | 1.355818 | 0.1382550 | 1.355818 E7 |
| 1 N•m | 8.850746 | 0.7375621 | 1 | 0.1019716 | 1 E7 |
| 1 kgf•m | 86.79617 | 7.233014 | 9.80665 | 1 | 9.80665 E7 |
| 1 dyne•cm | 8.850746 E-7 | 7.375621 E-8 | 1 E-7 | 1.019716 E-8 | 1 |
This chart visually represents how different units convert to Newton-meters: 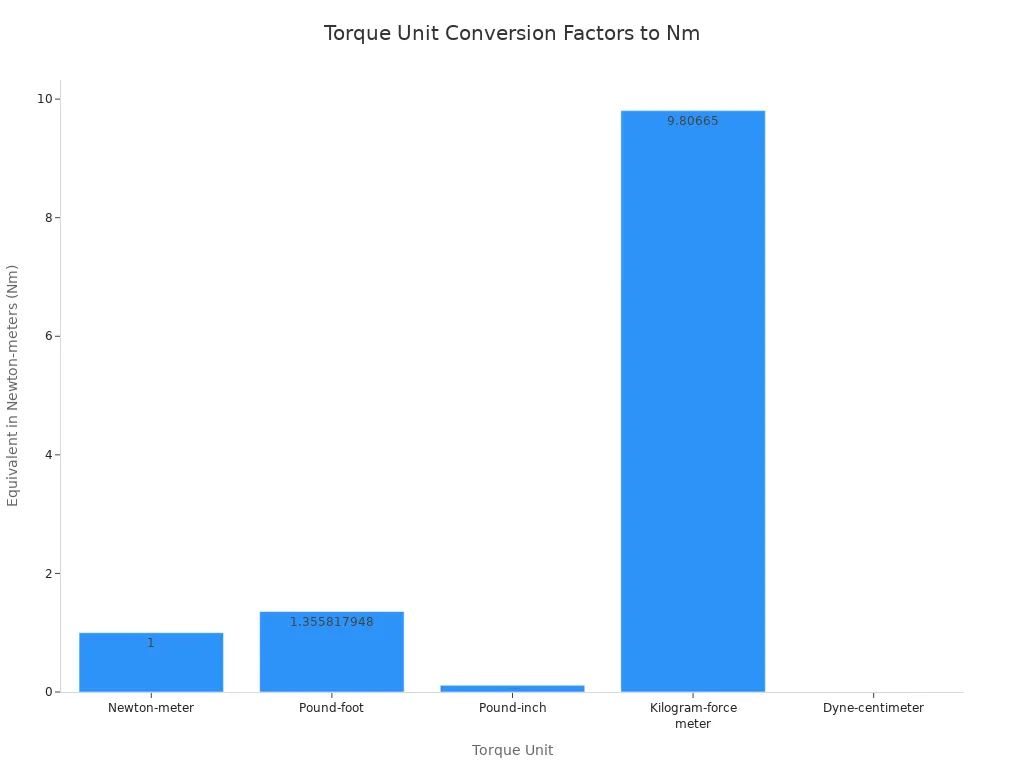 MARSHINE ensures its tools are designed for ease of use and accuracy across these various units, meeting diverse industry standards.

Finding the correct torque value is the first critical step for any tightening task. It ensures the fastener holds securely without damage. Industry standards, like ASME B18.6.3, offer starting points for thread cutting and rolling screws. However, these standards often recommend testing to find the best hole size and installation torque for each specific use. Many factors influence the required torque. These include hole size, material thickness, and material hardness. A smaller hole, for example, needs higher torque. Because of these variables, a universal torque value for thread-forming screws is not possible.
Engineers often calculate torque values using the formula T = KDP. Here, T is Torque, K is the torque coefficient, D is the nominal diameter, and P is the bolt clamp load. The K value changes based on surface conditions. For instance, waxed surfaces have a K of 0.10, while plain non-plated bolts have a K of 0.20. They convert these results into ft/lbs by dividing by 12. These calculations usually apply to Coarse Thread Series (UNC). For Grade 2 fasteners, calculations are limited to specific sizes and lengths; longer fasteners need much less torque.
Remember, these calculations are only a guide. Many things can affect the torque-tension relationship. Human error, surface texture, and lubrication all play a role. The most reliable way to find the correct torque is through testing under actual conditions. Using an incorrect torque value can lead to serious problems. Under-tightened parts can come loose, causing equipment failure or accidents. Over-tightened threads can strip or damage components. This can result in dangerous leaks, structural failures, or even catastrophic accidents. It also creates uneven stress distribution and increases accident risk for workers. MARSHINE understands these complexities and designs its tools to support precise torque application, helping users achieve optimal results and avoid costly failures.
Adjusting your torque wrench correctly is vital for accuracy. Always follow the manufacturer's guidelines. This prevents misuse, such as overloading or applying force incorrectly, which can affect calibration. When setting the wrench, visually confirm the value. This helps you avoid accidental miscalibration, like setting 98 instead of 100. Do not view the scale at an angle.
Keep the wrench clean, especially the head and internal mechanism. Lubricate parts as the manufacturer recommends. Even with good care, you should calibrate your torque wrench at least once a year or every 5,000 cycles. This maintains its accuracy and reliability. When you apply force, turn the wrench slowly and steadily until you hear or feel the click. Over-tightening past the click or swinging the wrench too quickly can lead to inaccurate torque. Also, consider the fastener's condition. Is it dry, greasy, or hot? Torque specifications often apply to specific conditions. Deviations can affect accuracy.
Using a torque wrench safely and effectively also depends on your grip and stance. It is best to pull the wrench handle rather than push it. Pulling offers better control and reduces the risk of over-torquing. Hold the torque wrench perpendicular to the fastener's axis. Apply force only to the handle's designated grip area. Use smooth and steady force, avoiding sudden jerking motions.
For better leverage and stability, use both hands if the tool allows. Position your fingers securely around the handle, distributing pressure evenly. Brace your body to stabilize the tool. Lean into the action to amplify force. Maintain a steady posture with your feet shoulder-width apart. This provides balance and grounding.
The tightening process involves several key steps to ensure optimal results. First, determine the torque requirements. Consider the maximum load, material strength, and joint type. Destructive testing can help find the failure point. Optimal torque is often 75% of that point, adjusted for factors like vibration.
Next, choose the right torque tool. Select tools based on production output, material type, required torque, and fasteners. Options range from pneumatic screwdrivers to industrial torque wrenches. Consider tools with data gathering capabilities. Use torque testers to calibrate tools, perform quick line tests, and verify fastener torque. These testers should have enough memory and store calibration data.
Cooperation is necessary among all production departments. Planners, supervisors, engineers, quality control, and assemblers must work together. This ensures consistent adherence to torque specifications. Provide training to employees on torque theory, tool operation, maintenance, safety, and ergonomics. Many professional tool suppliers offer this training.
Implement safety programs and use high-quality tools to prevent worker fatigue and injuries. Regularly inspect tools and work areas. Replace worn components and fix unsafe conditions. Establish a calibration program. Periodically check torque tools for proper settings, as settings can change easily. Set initial calibration intervals based on how severe the application is and the manufacturer's recommendations. Adjust these intervals as needed.
Perform preventive maintenance. Regularly inspect tools for wear or defective parts to maintain accuracy. Establish maintenance intervals based on cycles or hours of use. Service tools after 100,000 cycles or when you see wear. Precise torque control increases quality control. It prevents damaged parts during production and product failures in the market. Choose tool suppliers who offer solutions that improve assembly speed, enhance quality control efficiency, reduce errors, and ultimately save time and money.
A click torque wrench is designed to make a distinct sound and provide tactile feedback when it reaches the preset torque level. This "click" signals that you have achieved the desired torque. It helps prevent exceeding the preset torque. However, the wrench does not stop fastening automatically. You must stop immediately after hearing or feeling the click. This can be challenging, especially with cheaper wrenches that might have a less definite click.
Over-tightening can cause significant damage. It can strip threads or damage components. Under-tightening can weaken the attached item, making it unsafe. For example, the eTork EC3250 digital torque wrench provides a very noticeable audible and tactile click, almost like a pop. This clear feedback prompts a stop more effectively than just lights or beeping. It occurs precisely at the target setting. Always pay close attention to this feedback to avoid thread stripping or component damage.
When you tighten multiple fasteners in an assembly, the sequence matters greatly. There is no single "silver bullet" bolt tightening sequence for every flange or gasket type. The choice depends on the gasket type and the flange connection arrangement. ASME PCC-1, a leading guideline, covers several patterns.
The Star Pattern is a common method. You tighten bolts in a star pattern in three passes: 20-30% of target torque, then 50-70%, then 100%. After that, you follow with rotational passes until the nuts stop moving. This pattern works for all ASME B16.5, B16.47, and heat exchanger flanges. It is well-understood but can take time for flanges with many bolts.
The Modified Star Pattern is more time-efficient. It follows the same star pattern but increases bolt load faster. The first pass breaks into three parts: 1A (20-30% for the first four bolts), 1B (50-70% for the next four), and 1C (100% for the rest). Then, you follow with rotational passes. Soft gaskets need a full second star pattern pass.
The Quadrant Pattern is even more efficient. It involves a 'star sequence' for the first four bolts. Then, you tighten subsequent bolts immediately to the right. This pattern also uses passes like 1A, 1B, and 1C, continuing to the right. It is much faster for flanges with many bolts.
The Criss-Cross tightening sequence ensures uniform tension across the assembly. It minimizes uneven deformations and excessive stresses. This pattern is common in applications needing strict tolerances, like engine assembly or aerospace. You select a starting bolt, number subsequent bolts counterclockwise, and follow a specific series to tighten them.
MARSHINE offers a range of high-quality tools designed to support these precise tightening sequences, ensuring uniform load distribution and optimal assembly integrity. Their commitment to advanced, safe, and easy-to-handle products helps users achieve reliable results in various applications.
Working with carbon fiber components requires extra care. Carbon parts are delicate. They can easily crush or crack if you apply too much force. Always use lower torque values than you would for metal parts. Many people also use carbon assembly paste. This paste increases friction, so you need less torque to achieve the same clamping force.
Threadlock and anti-seize compounds change how much friction exists between threads. Threadlock increases friction. This means you need to reduce your torque setting to avoid over-tightening. Anti-seize reduces friction. You will need to increase your torque setting to achieve the correct clamping force. Always adjust your torque values when using these products.
Storing your torque wrench correctly helps it last longer and stay accurate. Always return the wrench to its case after use. Store it in a cool, dry place, away from direct sunlight or moisture. Avoid dropping the tool or placing heavy objects on it. This prevents misalignment of internal parts. For click-type wrenches, adjust the micrometer handle to its lowest setting before storage. This keeps the internal spring from losing elasticity over time.
Regular calibration is key for accurate torque application. International standards, like ISO 6789, suggest calibrating torque tools every 5,000 cycles or six to twelve months. If a tool is found inaccurate, you must recalibrate it. Then, you should halve the calibration interval to prevent future issues.
Many things can make a torque wrench inaccurate. For example, internal springs can lose elasticity in click wrenches. Over-torquing can deform strain gauges in digital models. A bent beam can affect beam wrenches. Calibration involves using a torque calibration tester. You apply a known force and measure any differences. Then, you adjust the wrench until its readings match the tester's force. MARSHINE provides reliable tools and supports their longevity through quality design, helping users maintain accuracy in all their projects.
Always prioritize safety when using a torque wrench. Correct settings and stopping at the click prevent damage. Accurate torque ensures fastener integrity and component longevity. Confidently apply these techniques for reliable results. MARSHINE provides advanced, safe, and easy-to-handle tools, supporting your precise tightening needs.
Experts recommend calibrating a torque wrench every 5,000 cycles or every six to twelve months. This ensures its accuracy. If it becomes inaccurate, recalibrate it and shorten the interval.
Over-tightening can strip threads or damage components. This leads to dangerous leaks, structural failures, or even catastrophic accidents. It also creates uneven stress.
No, one should not use a torque wrench to loosen bolts. This can damage the wrench's internal mechanism and affect its calibration. Use a standard wrench instead.


